Guides / Building and installing
Builders information pack.
Short answer: before we install, the builder needs the slab poured to the set-down on your drawings and at least 50 mm bigger than the lift, landing openings clear and barricaded, a dedicated 230 V single-phase or 400 V three-phase supply with a lockable isolator, an activated SIM card for the emergency phone, and clear access for delivery. Your customer-specific drawings give the exact numbers.
Everything your site team needs to get ready for an Aussie Lifts installation: slab, shaft, power, phone and access, in one place. For builders, site supervisors and trades.
Aussie Lifts. Last reviewed 25 October 2026.
Generic pack, read this first
Your customer-specific drawings always take precedence over this guide.
This guide covers the general requirements that apply to most sites. The exact dimensions for your job (pit depth, slab size, landing openings and the machine cabinet position) are on the drawings we issue after the site measure. If the two ever disagree, the drawings win. Not sure? Call us on 1800 287 543.
Every slab and footing detail here is an example only: slab design, engineering and certification are the responsibility of the builder and the builder's engineer, not Aussie Lifts. See section 04.
01
Start here.
A smooth install starts long before the truck arrives. Get the slab, openings, power and phone right and the lift itself is the easy part.
This guide sets out what we need from the builder before, during and after an Aussie Lifts installation. It's written for site supervisors and the trades doing the work, so it's practical and to the point. Use it for the how and why; use your customer-specific drawings for the numbers. Every lift we build at Acacia Ridge is designed to the relevant Australian Standards (AS 1735 series) and the National Construction Code. Meeting the requirements here keeps your programme on track and lets us hand over on the day we said we would.
How it all comes together.
- 01
Order confirmed
Your lift goes into our production schedule and we lock in the model, travel, entries and doors.
- 02
Site measure and drawings
We measure the site and issue your customer-specific drawings: slab and set-down, landing openings, power and cabinet position. Check them, sign them off and get them to your trades.
- 03
You prepare the site
Slab poured to the drawings, openings clear and barricaded, power and isolator in, conduit run, SIM card activated. Sections 03 to 11 have the detail; section 12 is the checklist.
- 04
Site ready
Tell us when the checklist is ticked off. We confirm the installation method, access and the delivery date.
- 05
Delivery and installation
The lift arrives and is stood, craned or re-assembled into position, then plumbed, fixed to the slab and connected.
- 06
Cladding and finishes
Once we give the go-ahead you clad the shaft and finish the landings and floors, inside the car and out.
- 07
Commissioning and handover
We test and commission the lift, install and test the emergency phone, and hand over to the owner. From there, regular servicing keeps it safe and reliable.
02
Three ways we install a lift.
How the lift gets to its final position shapes the access we need from you. We confirm the method for your job at the site measure. Here's what each one involves.
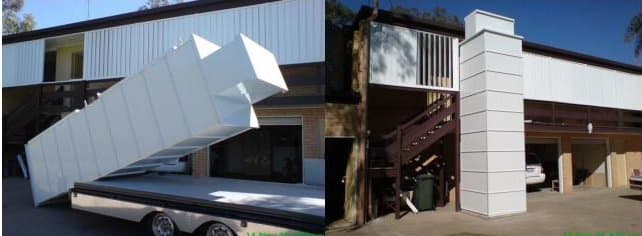
Manual: carried in and stood by hand.
Our most economical method. It suits externally mounted lifts, and internal positions with clear, unobstructed access during new construction. The lift arrives on a trailer, is walked to the slab and stood upright by hand. Paired with an external lift, it's a very cost-effective way to add access to an upper level.
What we need from you
- A clear, level path from the truck to the slab
- The standing area free of materials, stud walls and bracing
- Room to tilt the shaft upright without hitting eaves or services
Crane-in: complete or in segments.
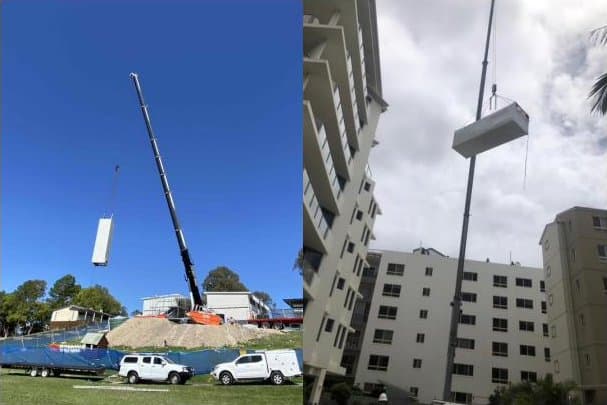
Our preferred method for internal lifts and for external positions that are hard to reach. A suitably rated crane and a licensed dogger lift the shaft and car into place, either as one complete unit or in segments: the first half of the shaft with the car, then the second half. Crane hire, traffic management and any permits are as set out in your quote.
What we need from you
- A standing area for the crane and a clear lifting path over the building
- The shaft open from above until the lift is in. We'll tell you exactly what to leave off
- Openings barricaded, penetrations covered and no one working overhead
Dismantle and re-assemble.
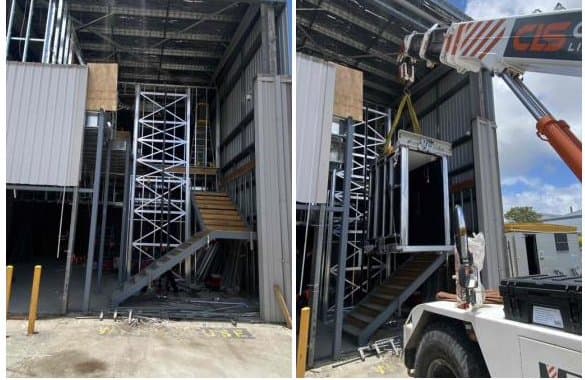
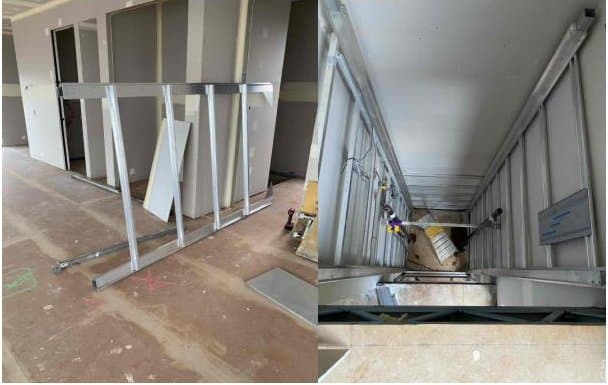
For tight sites where neither of the above works. The lift is fully manufactured and tested at our Acacia Ridge factory as normal, then the shaft is dismantled for delivery and re-assembled in position on site.
What we need from you
- A laydown area near the shaft for the panels
- Clear working room around the shaft on every level
- Protection for finished surfaces along the carry route
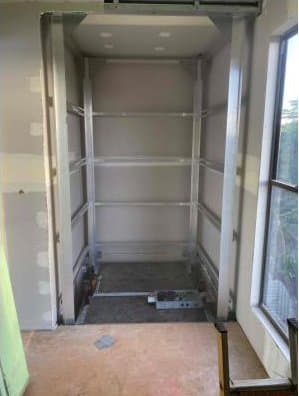
What we'll confirm at the site measure
Your programme needs numbers, so we'll give you these in writing with your drawings: the installation method, the lift's delivered weight and dimensions for crane sizing, the crane standing area and lifting radius, the truck access needed for delivery, how many days we'll be on site, and the notice we need to lock in a date.
Whichever method we use
The lift is a precision piece of equipment, not a builders' hoist. Keep the shaft, pit and landings clear from the day the slab is poured, and don't start cladding until we say go. The standard of the installation is what gives you years of smooth, trouble-free running.
03
Safety first, no exceptions.
A safe site is a legal requirement, and it's also how we keep your programme on track. Here's what we ask of every builder.
- 01
A safe working environment
By law, the client and/or builder must provide a safe working environment for Aussie Lifts employees and anyone on site at our invitation or request.
- 02
Site-specific safety assessment
Before we start, our team completes a job safety analysis (JSA) for your site. Let us know your site induction requirements before installation day so we can turn up ready.
- 03
Paperwork on request
Need our SWMS, licences, insurances or a copy of our JSA for your site file? Ask and we'll send them through before we arrive.
- 04
We stop if it's unsafe
If we consider conditions unsafe, we'll suspend work until they're fixed to our satisfaction. The same applies if conditions change part-way through. Any suspension will affect, and may extend, our lead time.
- 05
Nothing overhead
No work is to be carried out directly above any member of our installation team while the lift is going in.
- 06
Openings protected
Barricade every landing opening and cover every floor or deck penetration before the lift structure arrives, and keep them protected until handover.
Keep it clear
The shaft, pit and the 600 x 600 x 2000 mm zone in front of the machine cabinet stay free of materials, tools, water and rubbish at all times: before, during and after installation.
04
Slab and footings.
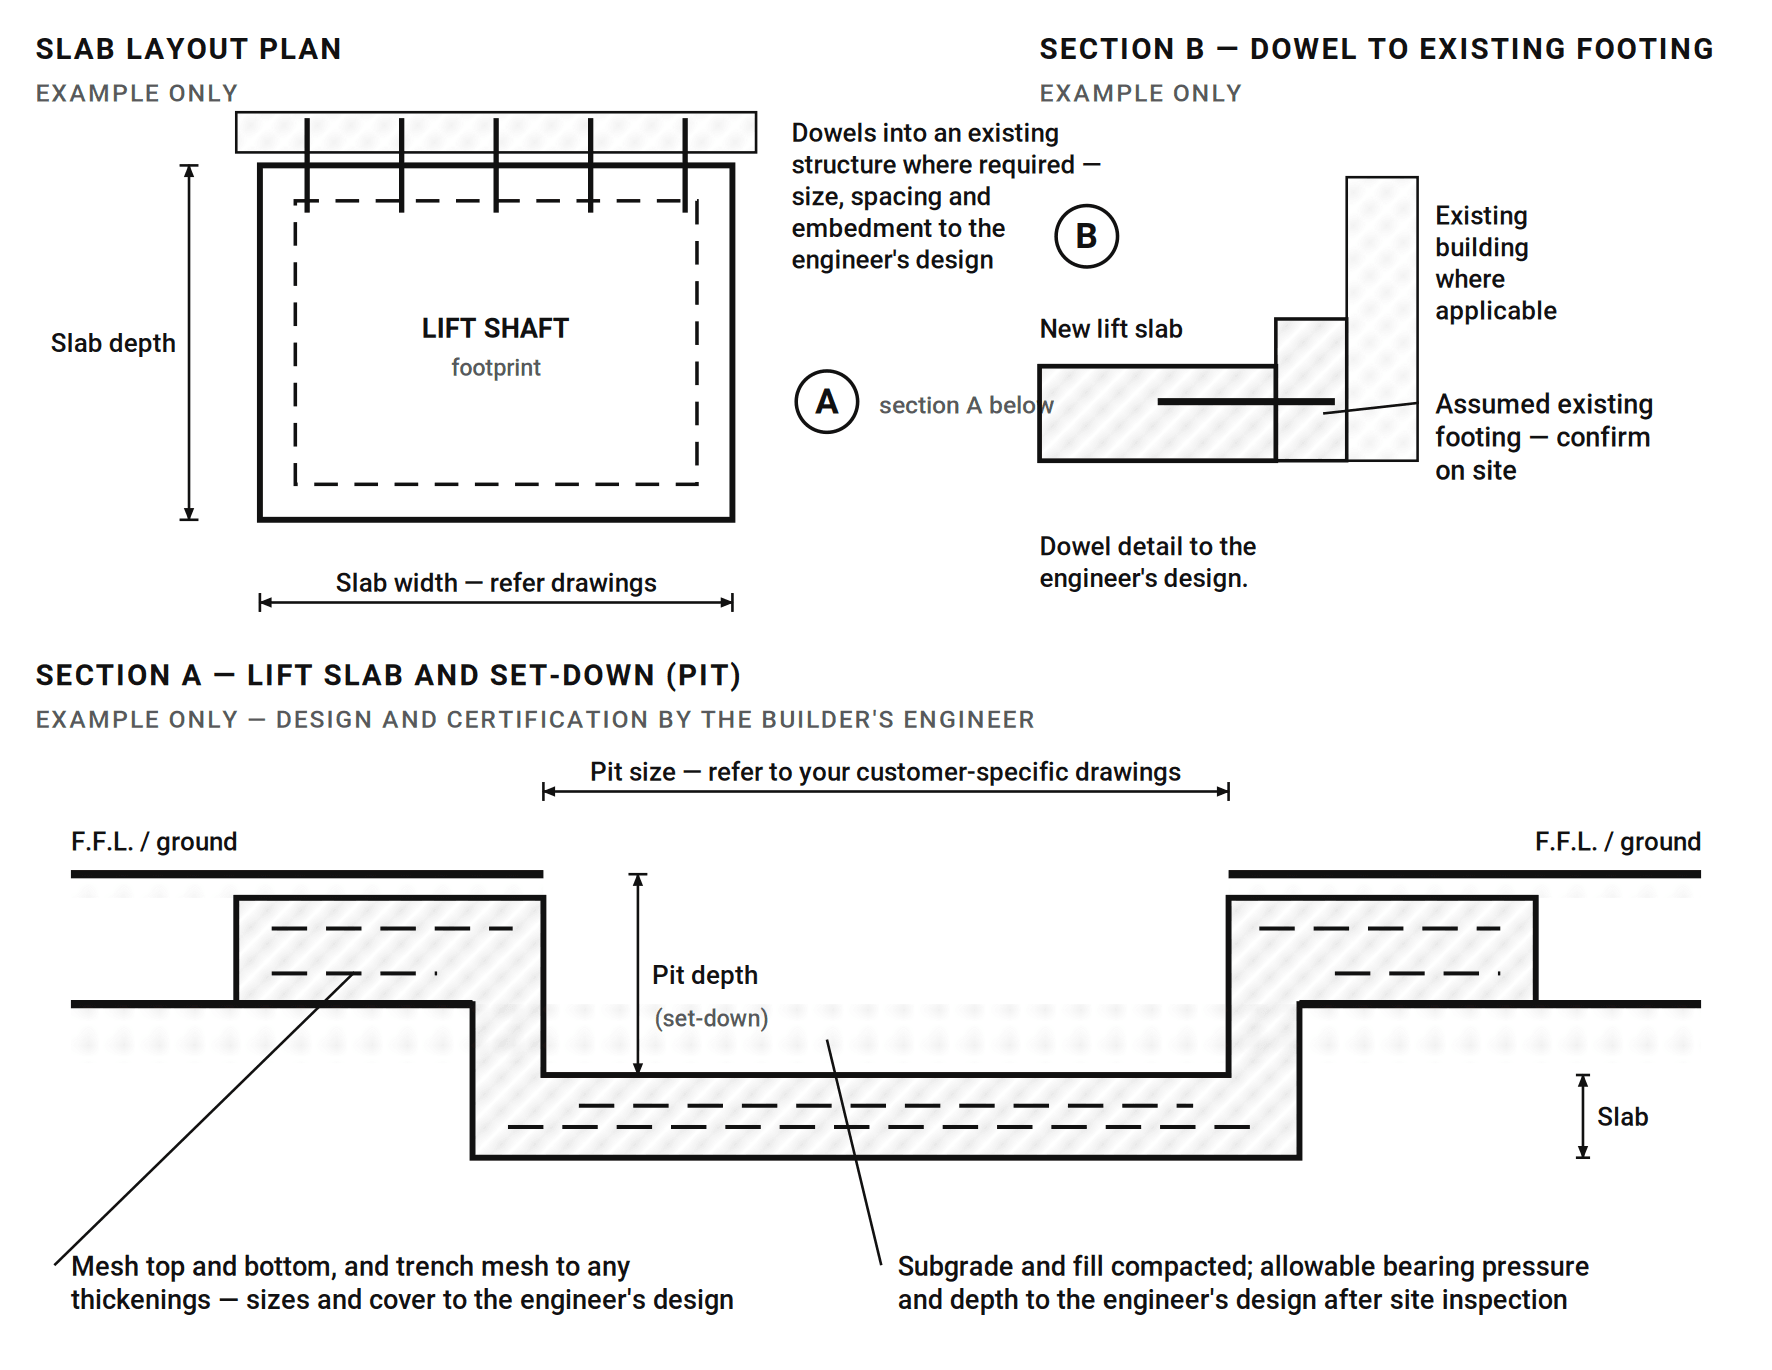
A sound, level, correctly set-down slab is the foundation of a good install. Every slab detail in this section is an example only: your engineer designs and certifies the slab, and your customer-specific drawings give you the dimensions.
Read this before you pour
Slab design isn't our scope.
The slab details in this guide are examples only. They're here to explain the principles (set-down, clearances and where our anchors land) and nothing more. The design, engineering, certification and construction of the lift slab, its footings and any parent structure are the responsibility of the builder and the builder's engineer. Aussie Lifts does not design or certify slabs and takes no responsibility for structural adequacy. What we give you is the lift's dimensions, set-down, anchor zones and loads on your customer-specific drawings. Your engineer designs to those, and to the site's soil test.
- 01
Design and certification is by the builder's engineer
The layouts and sections in this pack are examples only. Your engineer designs and certifies the slab for the lift shown on your drawings, using the site's soil test.
- 02
Check the ground first
Depending on ground conditions, some sites need footings or piers beneath the lift slab. Refer to your soil test and your engineer.
- 03
Lay it on solid ground
The mounting slab is to be laid on solid or suitably certified compacted ground.
- 04
Set it down for a flush entrance
The slab is set down from the surrounding finished floor, path or ground so the lift car floor finishes flush at the entrance. The set-down (pit depth) varies by model: take it from your customer-specific drawings.
- 05
Make it 50 mm bigger than the lift
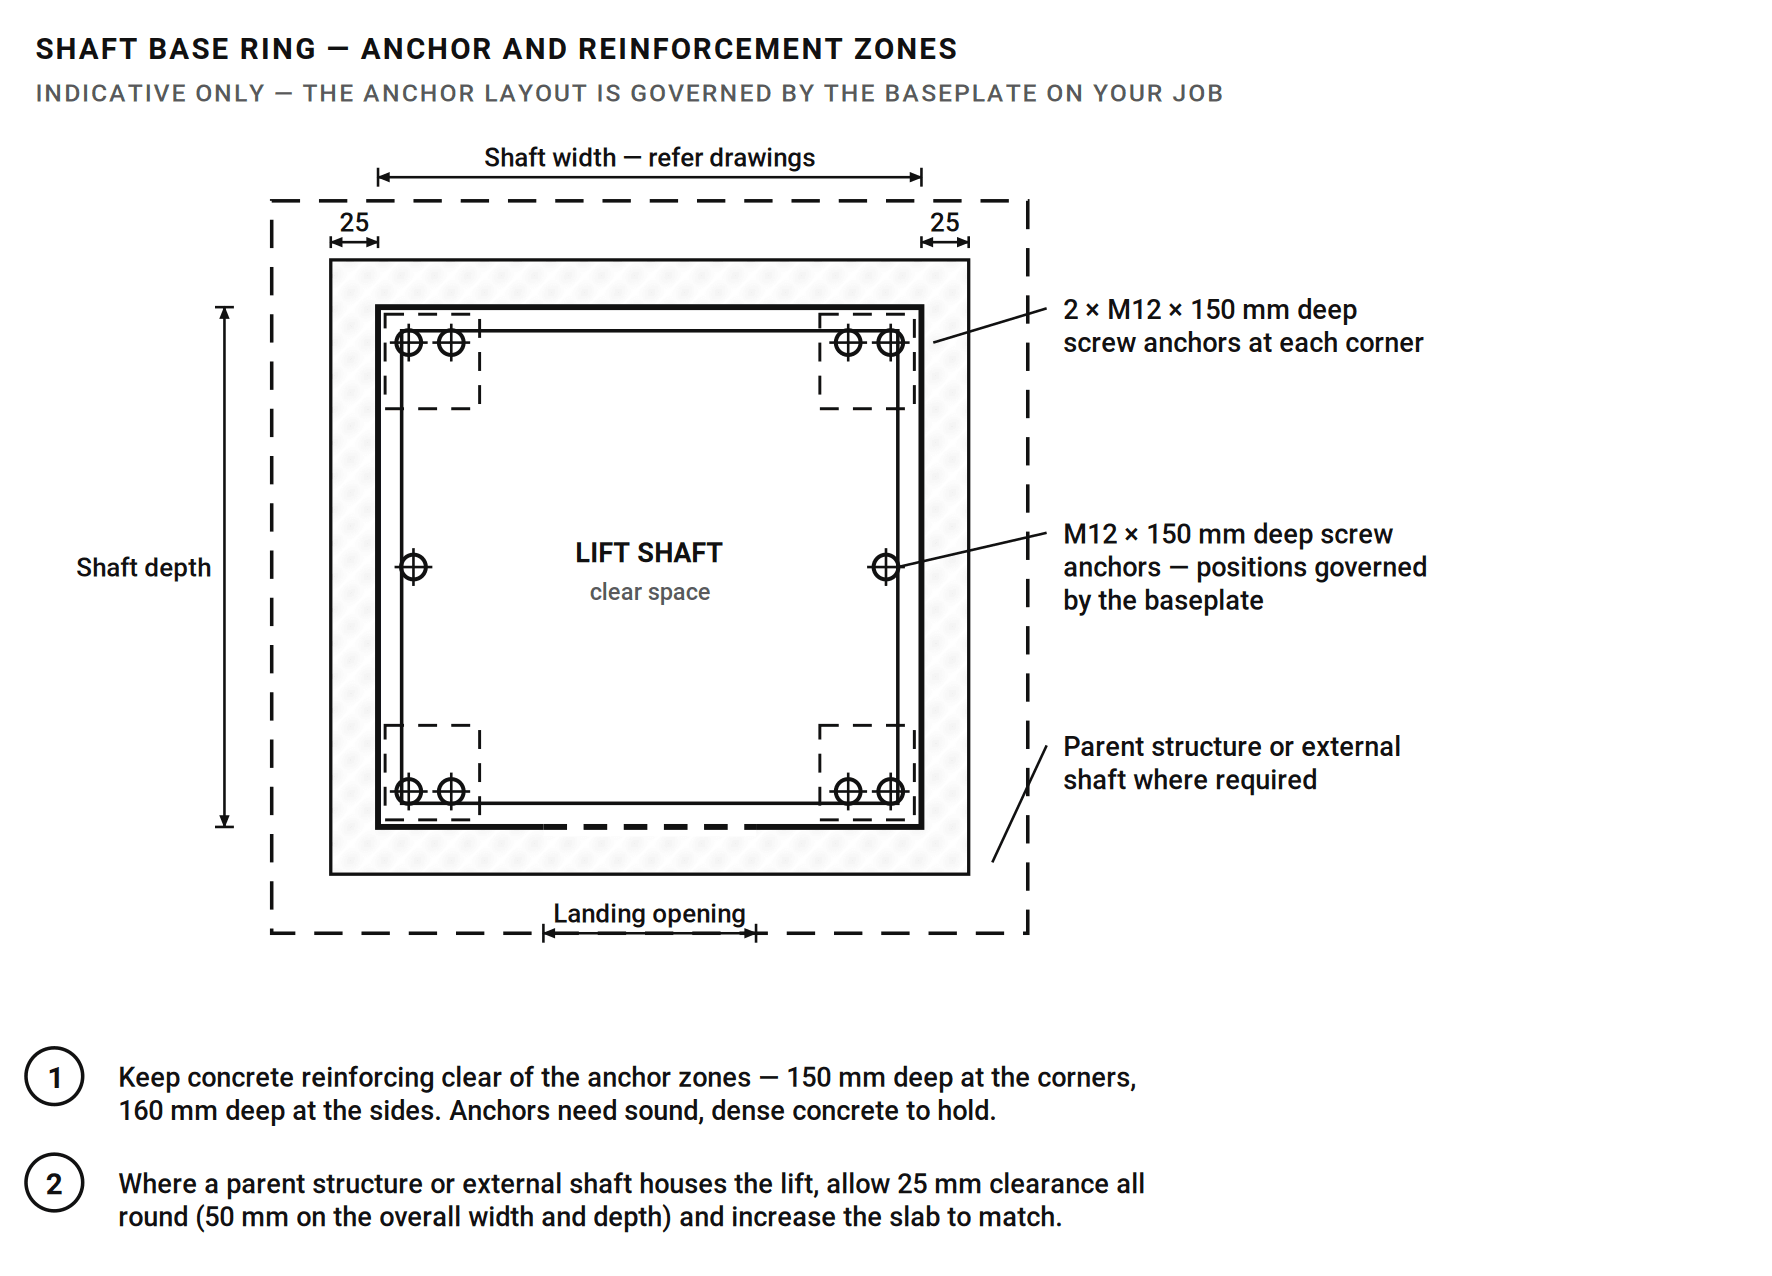
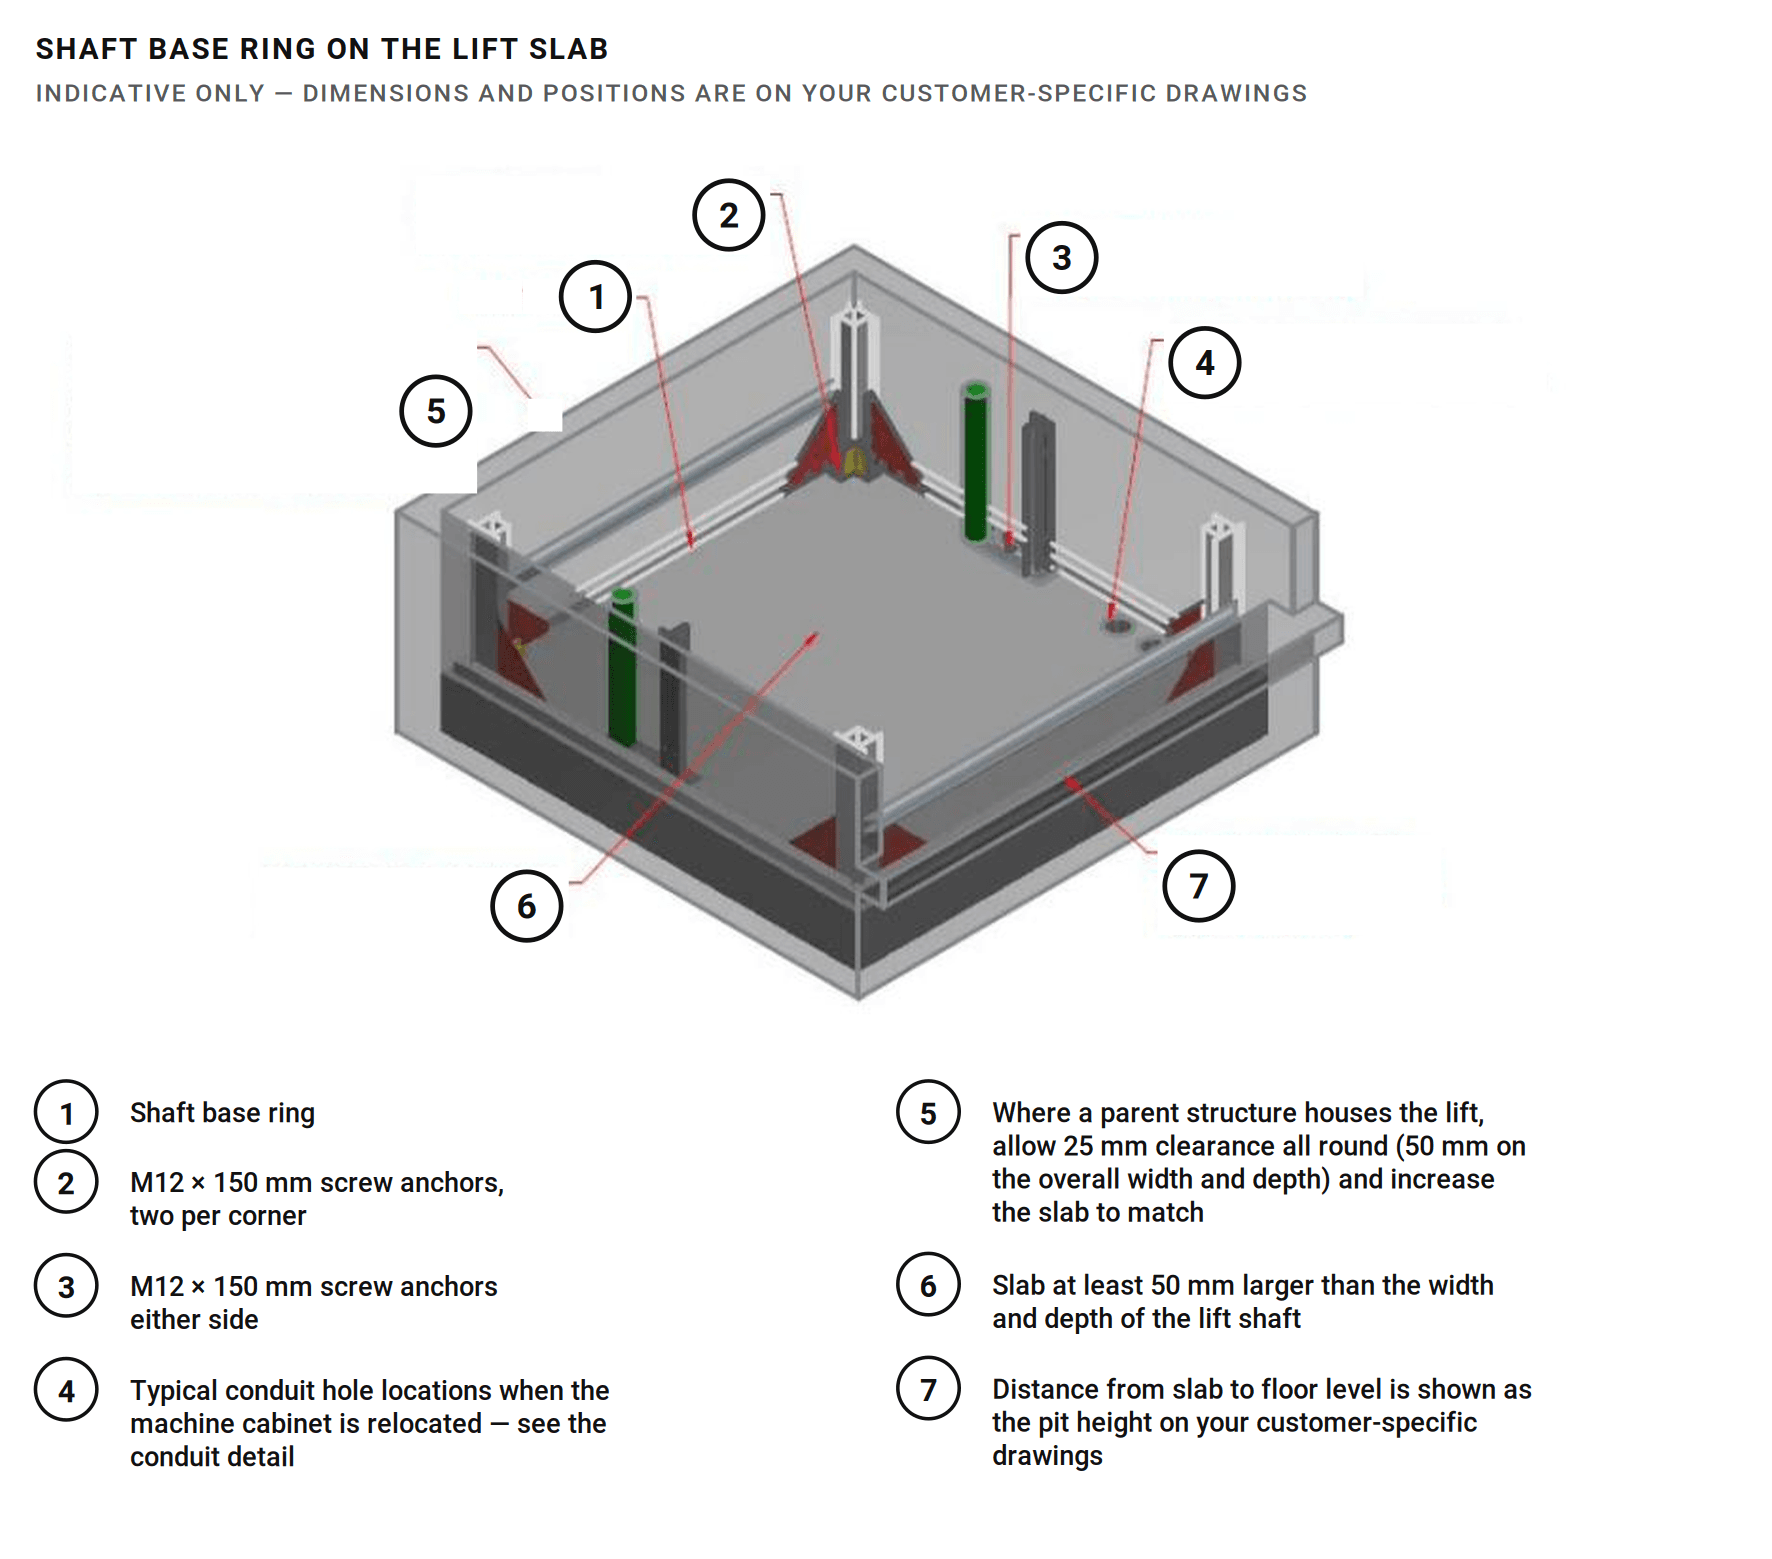
The slab must be at least 50 mm longer and wider than the lift footprint, 25 mm each side, so our installers can position and plumb the lift.
- 06
Allow for a parent structure
Where a builder-constructed shaft or external structure houses the lift, allow 25 mm clearance all round, 50 mm on the overall width and depth, and increase the slab to match. Without it the lift may not fit.
- 07
Fix down to solid concrete
We anchor the shaft base ring to the slab at each corner with M12 x 150 mm screw anchors (two per corner), as shown on the slab drawing. The slab needs enough density and thickness to hold them, so keep reinforcing steel clear of the anchor zones on the drawing to the depth noted.
- 08
Level and cured before we arrive
The slab needs to be level, clean, dry and cured before installation, to your engineer's specification.
- 09
Mark a datum
Mark a level datum line at the slab and at each landing so our installers and your trades are working to the same finished floor levels.
- 10
Termite barriers
The anchors may penetrate a termite barrier. Any remedial work as a result is the responsibility of the builder or owner.
- 11
Drain external slabs
Fit a drain to any externally located lift slab to carry away water ingress. It protects the lift for the long term.
- 12
Keep water out of set-downs
Any additional trench set-downs must be protected against water penetration or seepage. No plumbing, sump or services in the pit without our written approval.
- 13
Keep it clean and dry
The slab, pit and footings are to be kept free of water, rubbish and builders' waste at all times: before, during and after installation.
50 mm
Minimum extra slab length and width, 25 mm each side of the lift footprint
It's a small allowance that makes a big difference. That 25 mm each side is what lets our installers plumb the shaft true, which is what gives you level landings and quiet, even running for years. Tight slabs cost time on install day.
Pit depth, slab dimensions and the position of any conduit entry are all on your customer-specific drawings. Work from those, not from this page.
05
The machine cabinet.
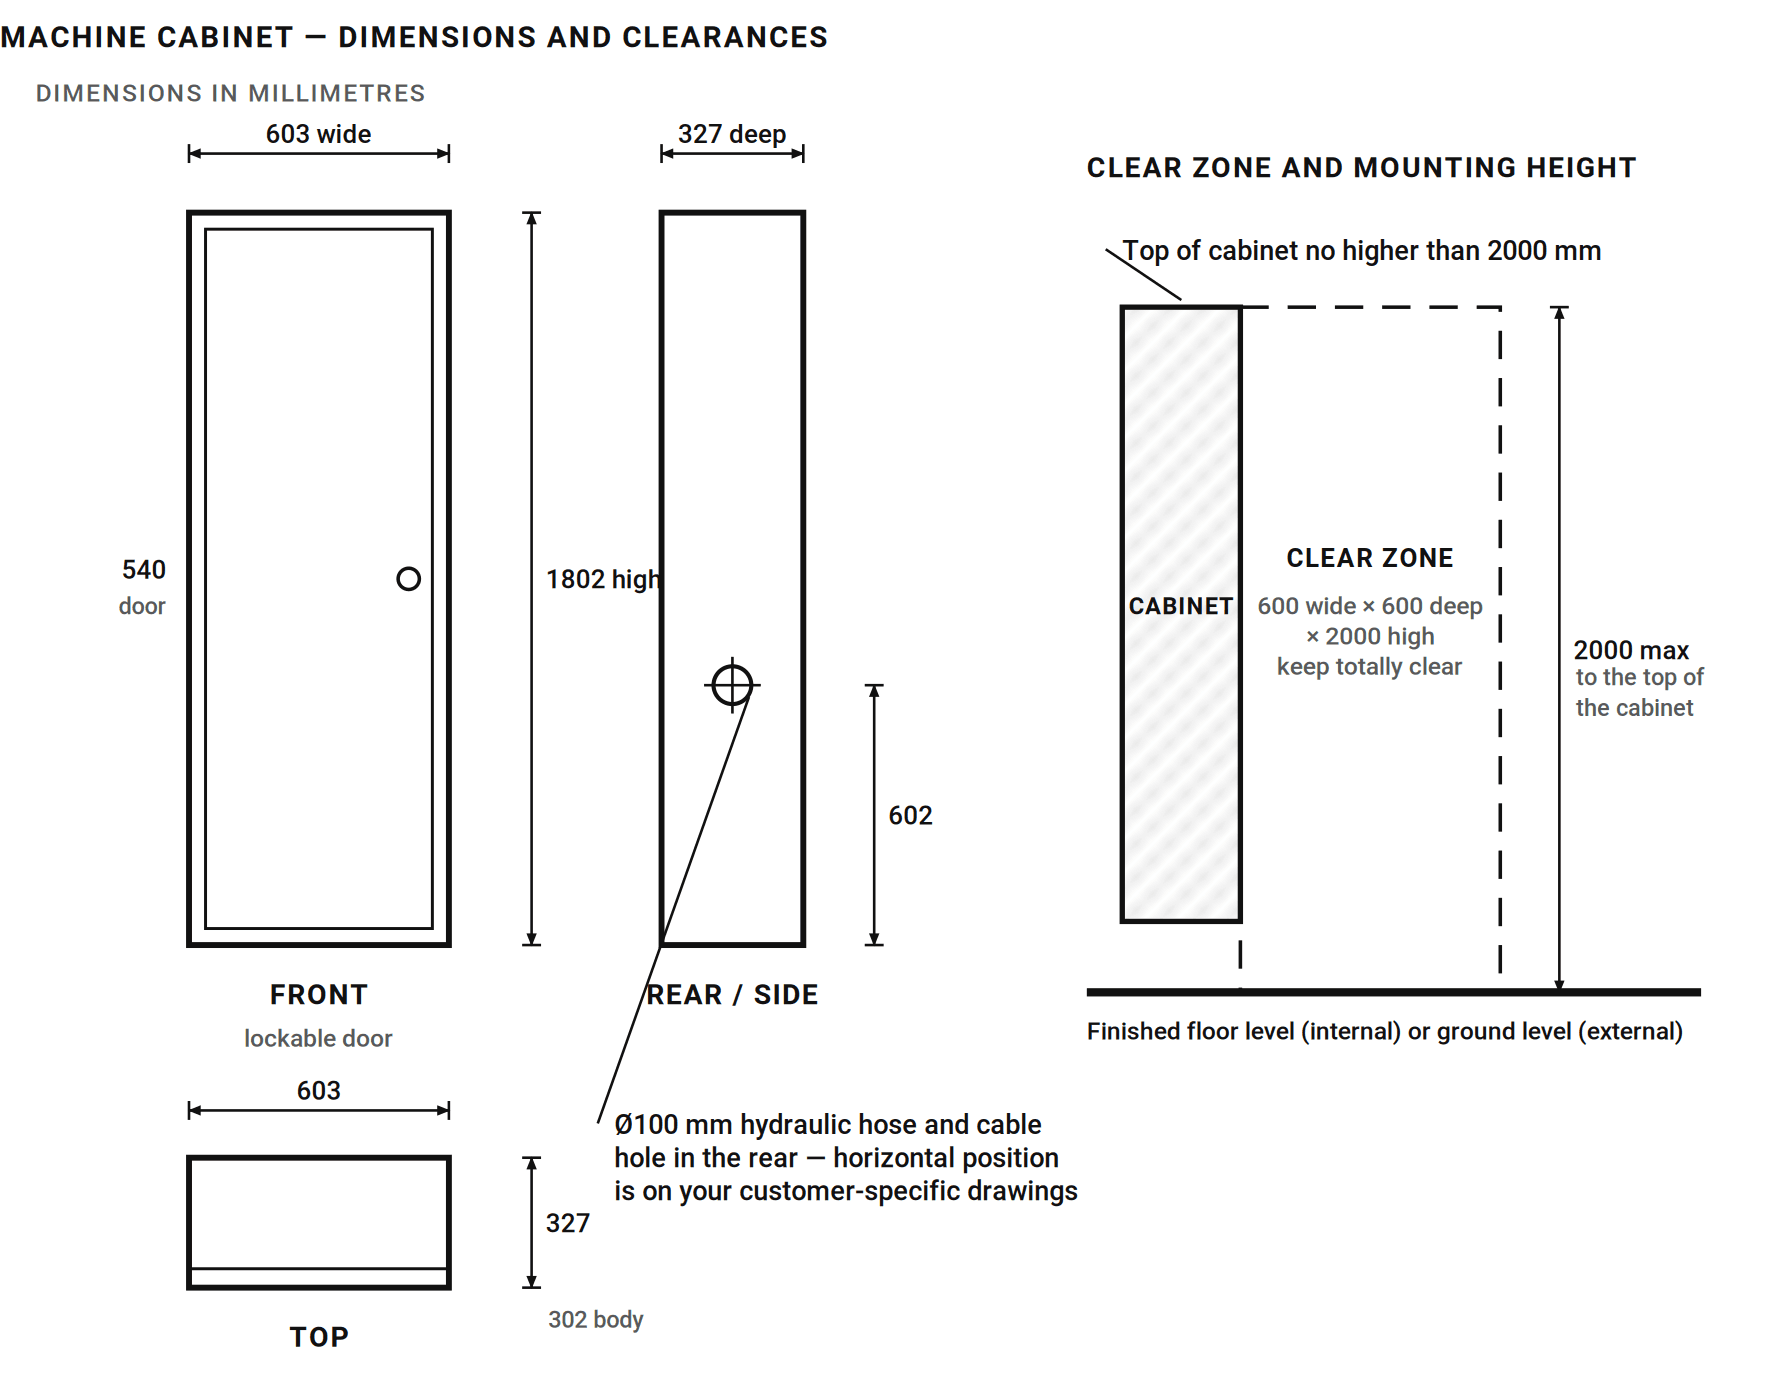
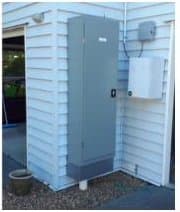
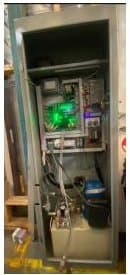
The cabinet houses the lift's controller (PLC), power supplies and the hydraulic tank and pump. It's a lockable steel cabinet suited to internal or external mounting, and its position is shown on your drawings.
| Machine cabinet | Detail |
|---|---|
| Construction | 1.2 mm painted mild steel, lockable door |
| Height | 1802 mm |
| Width | 603 mm |
| Depth | 327 mm |
| Mounting | Internal or external |
| Maximum height to top of cabinet | 2000 mm above finished floor (internal) or ground (external) |
| Clear zone in front of the door | 600 mm wide x 600 mm deep x 2000 mm high |
| Hose and cable exit | Ø100 mm hole in the rear of the cabinet |
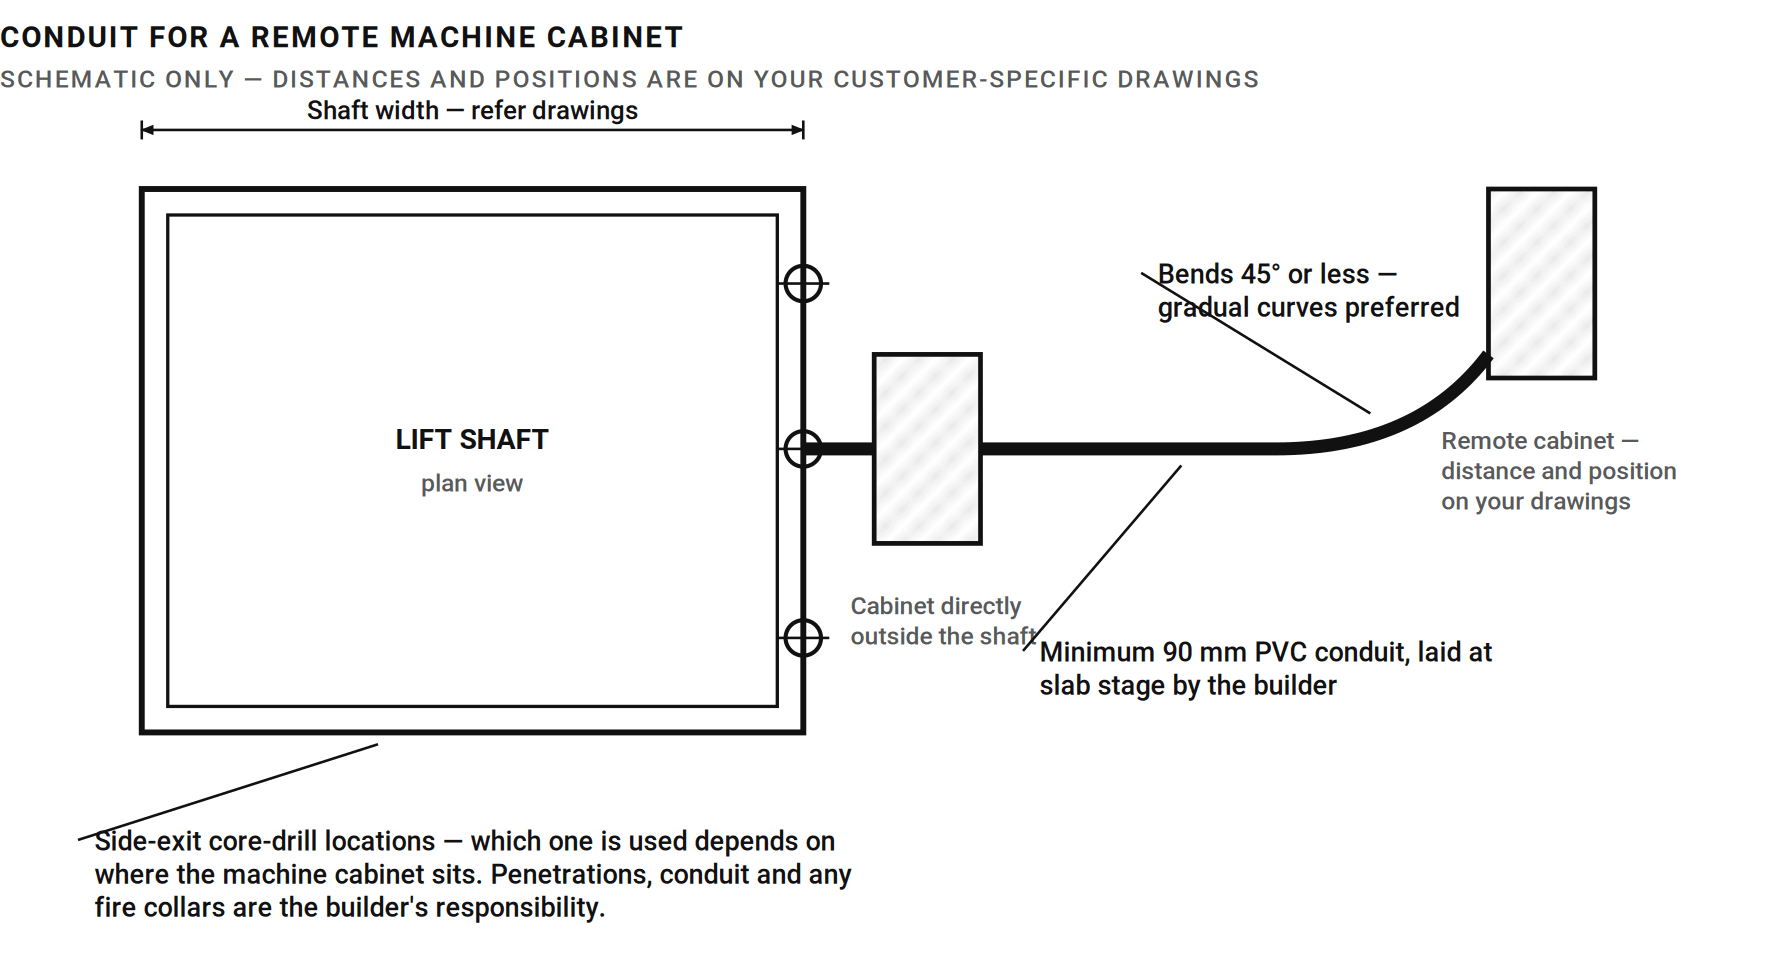
| Conduit for a remote cabinet | Minimum 90 mm PVC, bends 45° or less, gradual curves preferred |
Location.
Keep the cabinet as close to the lift as possible, preferably on the ground floor. In specific situations it can be located remotely at extra cost. A remote cabinet needs custom-length hydraulic hoses and electrical cabling from us, plus conduit supplied and installed by the builder at slab stage, so the decision has to be made before the slab is poured.
One more thing to check before you settle on a position: the emergency phone gateway needs a working mobile signal. Basements, plant rooms, metal-clad enclosures and deep under-stair cupboards can kill reception. Test the signal at the proposed location before the slab goes down.
Access.
The cabinet contains live electrical equipment. It must be accessible at all times, with the 600 x 600 x 2000 mm zone in front of the door kept totally clear. It also needs to stay accessible after handover: our technicians need to get to it for every service, and the owner needs the key.
Penetrations and conduit.
If the cabinet position means hoses and cables have to pass through the slab or any block or brick wall, the builder provides suitable penetrations and conduit for them. Where a wall is fire-rated, the fire collars and sealing to the required fire resistance level (FRL) are also the builder's responsibility.
Keep conduit bends to 45° or less (gradual curves are better than elbows) and use a minimum 90 mm PVC pipe. The hoses and cables leave the cabinet through a Ø100 mm hole in the rear.
Termite barriers.
If any termite barrier or treatment is compromised during the installation, the builder arranges and pays for the reinstatement of the barrier or treatment.
06
Lift shaft, openings and penetrations.
Our lifts arrive with a self-supporting shaft, so no load-bearing walls are needed. The flip side: the shaft can't carry any of the building's loads, and it needs clear room to go in and be clad.
Structure, whichever way we install.
- No timber stud walls are to overhang the mounting slab, set-down or pit.
- No bottom plates are to be left across where a lift door will be located. This applies to every landing.
- No temporary bracing or struts are to run through the lift shaft area.
- The shaft cannot be used to support any vertical or horizontal loads or forces.
- No bearers, joists or supporting beams are to be fixed to, or supported by, the lift shaft.
- If you're building a shaft or external structure around the lift, allow 25 mm clearance all round (50 mm on the overall internal width and depth) and keep it plumb and square. A tight or out-of-square shaft is one of the most common causes of a delayed install.
- Headroom at the top landing and the overall shaft height for your job are on your customer-specific drawings. Check them against your ceiling and roof framing early. Headroom is very hard to find later.
- Where the NCC requires the shaft to be fire-rated or smoke-sealed, that work is the builder's, and we'll need to know before manufacture so the structure and door frames suit.
Landing openings.
- Provide a clear opening at each landing, sized to your customer-specific drawings. No stud or block walls are to be built in or around the lift entrances.
- Protect every opening with barricades before the lift structure is installed.
- If automatic door operators are selected, run a conduit with a draw wire from the lift shaft to each remote station location. Secure the conduit at the station end and mark it clearly LIFT CONTROL.
Floor and deck penetrations.
- Penetrations in the upper floors must line up vertically with the concrete set-down in the lift slab.
- Provide hoarding, barricades or covers to every floor and deck penetration so there is no access.
Ceiling and roof.
- Keep all rafters, ceiling joists and similar members clear of the lift shaft.
- Absolutely no services are to be placed in the lift well or above it without prior written approval from Aussie Lifts.
- Fit barrier protection in the roof cavity over the lift shaft, and sheet the top of the shaft so no person, animal or object can fall down it.
Landings.
- No work is to be carried out around the lift landings, and lift flashings are not to be covered over, until final commissioning and handover are complete.
- Flashing and weatherproofing where the lift meets your cladding, roof or external walls is builder's work unless your quote says otherwise. Check your quote and ask us early: it's a common gap on external lifts.
Cladding the shaft.
The shaft comes with integral aluminium battens, so cladding fixes straight on with no extra framing.
- Externally located lifts are most commonly clad in weatherboard, fibre cement planks or COLORBOND® steel sheeting in a range of profiles. Fibre cement or polystyrene sheet with a rendered and painted finish is also very effective. All of these fix directly to the battens.
- Internally located lifts not inside a builder-constructed shaft can be clad directly in plasterboard, fibre cement, MDF or plywood. Again, everything fixes to the battens on the shaft.
- Some models are supplied with steel cladding fitted at the factory. Your quote and drawings will say so.
Have the cladding material on site and the fixings sorted, but leave it stacked. Once the shaft is plumbed, fixed and signed off by our team, you'll get the go-ahead to clad, usually the same day.
Hold off until we say go
Cladding cannot start until the lift is located and secured in place and we've given you the go-ahead. Any delays or additional work for our team caused by cladding fitted early may result in a variation for the extra cost.
07
Power supply.
Your licensed electrical contractor installs the supply and isolator; our installers connect the tail to the machine cabinet. Everything below must be complete, certified and live before installation starts.
| Electrical requirement | Specification |
|---|---|
| Supply | Permanent, dedicated supply: 230 V single-phase (commonly called 240 V) or 400 V three-phase, as shown on your drawings |
| Conductors | Active, neutral and earth conductors with a minimum cross-section of 2.5 mm² |
| Cable sizing | Sized to suit the running current and to allow a voltage variation of +10 % / -6 % at start-up |
| Circuit protection | 20 A MCB, Type B |
| Earth leakage protection | 20 A residual current device (RCD), 30 mA (0.03 A) sensitivity |
| Earthing | An earthing conductor for the complete lift installation, fitted in the main isolating unit or device |
| Isolator | Lockable (lock-off) isolator adjacent to the machine cabinet with a 5 m glanded tail, left ready for our team to connect to the cabinet |
| Standards | Installed by a licensed electrical contractor to the current Wiring Rules (AS/NZS 3000) and regulations, and completed before lift installation begins |
| Power for our installers | A 230 V general-purpose outlet adjacent to the machine cabinet, live for the duration of the installation |
Who does what
The site's electrical contractor supplies and installs everything in the table above and provides the certificate of electrical safety. Aussie Lifts connects the glanded tail to the machine cabinet and wires the lift itself. Aussie Lifts Pty Ltd holds Queensland Electrical Licence 54227 and NSW Electrical Licence 477792C.
08
Emergency phone: sort the SIM early.
Every lift has an emergency phone in the car. We supply a wireless gateway in the machine cabinet, so no hardwired phone line is needed, but the gateway needs an activated SIM card before we can hand over.
Important
No SIM, no handover.
Our technician installs and tests the emergency phone at commissioning. Without an activated SIM card we cannot complete the handover, and that's a delay nobody wants on the last day of the job.
The SIM card.
- A standard-size SIM card, activated and on site before commissioning day. Check the SIM size with us before you buy.
- From a carrier with proven coverage at the site. Check the coverage map before you buy: the lift doesn't get a second chance in an emergency.
- Compatible with our 4G gateway. The old 3G networks have been switched off across Australia, so make sure the SIM and plan are 4G-capable.
- Prepaid is fine, provided the SIM stays active without regular use and someone keeps the credit topped up.
- Simplest option: an inexpensive call-only, month-to-month plan in the owner's name, so it doesn't lapse when the build wraps up.
Hardwired alternative.
If the owner doesn't want the wireless gateway, the electrical contractor must supply a dedicated phone line terminating at the machine cabinet with a minimum 5 m tail. Our team connects it to the lift controller. The lift phone is an analogue handset built for a conventional analogue (PSTN-style) connection.
Worth knowing: the old copper network has been switched off across most of Australia, so a true analogue line is rarely available any more. Where phone service runs over the NBN or VoIP, a suitable analogue interface with battery backup is needed to keep the lift phone working in a power outage. The owner's network installer or service provider can advise. On almost every new build the wireless gateway is the practical choice.
09
Floor finishes.
The lift car floor is set to finish flush with each landing, which only works if the floor finishes are known and in place.
- Lay all floor coverings inside and outside the lift before commissioning. It removes trip hazards and lets us set the car floor flush with each landing.
- Lock in floor covering thicknesses before the final measure. Any change to thickness after the final measure will put the car floor out of alignment with the landings.
- Sequencing, since these two pull against each other: lay the floor finishes up to and across each landing threshold before we commission, but don't work around the landings or cover the lift flashings afterwards. In short, finishes in first, then leave the lift alone.
10
Site access, work area and amenities.
Our installers need room to work and a site that's ready for them. Here's the short list.
- Access for delivery and for standing the lift on site, to suit the installation method: manual, crane-in, or dismantle and re-assemble (see section 02).
- A clear working area for access to and around the lift shaft on every level.
- The area directly in front of the machine cabinet left totally clear.
- A 230 V general-purpose outlet adjacent to the machine cabinet for our installers' tools.
- Protection of the lift, cabinet and controls from dust. Sanding, dry grinding, sawing and masonry cutting near the shaft all need to be managed.
- Access to on-site waste bins for our rubbish.
- Clean toilets and water for washing available to our team.
11
Insurance, approvals and protecting the lift.
Once the lift is delivered it's a valuable piece of equipment sitting on a busy site. Here's how the responsibilities fall.
Protecting the lift.
- From the moment it's delivered to site, the lift is the builder's responsibility to protect.
- Damage caused by others, whether malicious, accidental or by acts of nature, is not covered under the Aussie Lifts warranty. The cost of repair sits with the responsible party.
- Take out an insurance policy from the day the lift lands on site. It should cover, but not be limited to, damage from trades, fire, storm, flood, vandalism and construction defects.
- Home warranty insurance: in Queensland this is administered by the QBCC (formerly the BSA). Talk to us about how it applies to your job.
Council and approvals.
- Aussie Lifts makes no allowance for council approvals, site drawings, or council fees and charges that may apply.
- Any relaxation for encroachment onto property boundaries is handled by the builder, architect or owner.
- Tell us early what your building certifier needs for the lift, so we can have the paperwork ready at handover.
- Some lifts and some building classes need registration or additional documentation under work health and safety law. Tell us the building classification and we'll confirm what's needed for your job.
Important
Not a builders' hoist.
The lift must not be used to move people or materials during construction. Using it before commissioning voids the warranty, and it's not safe. Full stop.
12
Ready for us? Run the checklist.
Tick these off before you call to confirm the delivery date. Every item is covered in this guide, with the section number alongside.
| Done | Item | Who | See |
|---|---|---|---|
| Customer-specific drawings received, checked, signed off and issued to your tradesBuilder | Builder | 01 | |
| Slab designed and certified by your engineer; footings or piers if the soil test calls for themBuilder | Builder | 04 | |
| Slab level, clean, dry and cured to your engineer's specification before installation dayBuilder | Builder | 04 | |
| Level datum marked at the slab and each landingBuilder | Builder | 04 | |
| 25 mm clearance all round where a builder-built shaft or parent structure houses the liftBuilder | Builder | 04, 06 | |
| Slab poured to the set-down on the drawings, at least 50 mm larger than the lift footprintBuilder | Builder | 04 | |
| Reinforcing kept clear of the anchor zones; termite barrier reinstatement plannedBuilder | Builder | 04 | |
| Drain fitted to any external slab; pit clean and dryBuilder | Builder | 04 | |
| Cabinet position confirmed; conduit and penetrations in for a remote cabinet (90 mm PVC, 45° or less)Builder | Builder | 05 | |
| Fire collars and sealing to FRL where conduit passes through fire-rated wallsBuilder | Builder | 05 | |
| Landing openings clear (no stud or block walls, no bottom plates) and barricadedBuilder | Builder | 06 | |
| Floor and deck penetrations lined up with the slab set-down and coveredBuilder | Builder | 06 | |
| Roof cavity barrier fitted; top of shaft sheeted; no services in or over the wellBuilder | Builder | 06 | |
| Headroom at the top landing checked against your drawings before framing the roofBuilder | Builder | 06 | |
| Fire-rating or smoke-sealing of the shaft confirmed with us before manufacture, if requiredBuilder | Builder | 06 | |
| Conduit with draw wire to each remote station, marked LIFT CONTROL (auto doors only)Builder | Builder | 06 | |
| Cladding material on site but not fitted, waiting on our go-aheadBuilder | Builder | 06 | |
| Dedicated 230 V single-phase or 400 V three-phase supply, protection, earthing and lockable isolator with 5 m tail, certifiedElectrician | Electrician | 07 | |
| General-purpose outlet live beside the machine cabinetElectrician | Electrician | 07 | |
| Mobile signal checked at the machine cabinet position before the slab is pouredBuilder | Builder | 05 | |
| SIM card purchased, activated and on site (or dedicated phone line at the cabinet)Owner / builder | Owner / builder | 08 | |
| Floor covering thicknesses confirmed before the final measureBuilder | Builder | 09 | |
| Delivery and crane access sorted; standing area and room around the shaft clearBuilder | Builder | 02, 10 | |
| Toilets, water, bins and dust control arrangedBuilder | Builder | 10 | |
| Lift insured from delivery; site induction requirements sent to Aussie LiftsBuilder | Builder | 03, 11 | |
| Flashing and weatherproofing responsibility confirmed against your quoteBuilder | Builder | 06 |
All ticked? Call 1800 287 543 or email info@aussielifts.com.au and we'll lock in the date. Too easy.
13
Handover and beyond.
Commissioning is where it all comes together. Here's what to expect on the day, and what keeps the lift running well afterwards.
At commissioning.
- We test every safety system and run the lift through its full travel, stopping at each landing.
- We install and test the emergency phone with the activated SIM card or connected line.
- Floor finishes inside and outside the car, landings and flashings need to be complete. Don't cover flashings or work around the landings until we've finished.
- We hand over to the owner and run through operating the lift, the emergency phone and what happens in a power outage.
After handover.
- Servicing: residential lifts are serviced every 12 months, commercial lifts every 6. Our technicians inspect, test and report on every safety system. No stress, no worries.
- Warranty: our industry-leading warranty covers the lift from handover, on the terms in your quote. It doesn't cover damage by others or use during construction.
- Support: 1800 287 543, or info@aussielifts.com.au. Brisbane, Sydney and Melbourne.
- At handover you'll get the operating instructions, the compliance and commissioning paperwork, and the keys. Pass them to the owner and keep a copy for your certifier.
- What costs extra: return visits because the site wasn't ready, cladding fitted before we've given the go-ahead, work suspended because the site was unsafe, and repairs to damage caused by others. We'd all rather avoid these, so run the checklist in section 12 before you call us in.
7,000+
Lifts installed across Australia since 1995
Questions about site prep, access or timing?
Give us a call, no stress, no worries.